 Time to check in on our seeds! Everyone brought their bean seeds back to class so we could compare the growth and discuss what we observed. The students were all excited to share what their seeds were doing, and we realized that the few that hadn't sprouted were random and did not correlate with which direction they were put into the bag. The seeds knows which way to send the roots and the stem no matter what direction it is facing. We also saw that seeds do not need dirt to sprout, but we discussed how the nutrients stored in the seed will eventually be used up and the plant will then need the extra nutrients it gets from the ground. Now, the kids can plant their beans at home!  Then, it was time to learn about photosynthesis. I had the students fill out a K-W-L chart: What they KNOW, what they WANT to learn, and then, after we watched a short video and discussed, what they LEARNED. We had some good questions in the Want to Learn column, such as "Could people ever evolve to perform photosynthesis?" and "What part of the sunlight do the plants use?" After our discussion, it was time to model the photosynthesis equation. Each student was given a set of beads in three colors representing the atoms that are required for photosynthesis. They used pipe cleaners to create molecules of CO2 and H2O and we talked about how this is the air and water that the plants take in through the leaves and roots. They drew the chloroplasts on their "leaf" bag, put the molecules into the bag, and held them up to the sun. Then, because the bags aren't actually magic ;), they got to be the energy and broke apart the molecules to reform  Glucose! I gave them both the formula and a diagram to follow so they were able to make a model of a glucose molecule, just like the plant would do during photosynthesis.
They quickly found that once they'd made glucose, there were a lot of oxygen beads left--which is why plants give off O2 and why we can breath--an important by-product of the reaction for sure! Hopefully doing hands-on modeling of the whole process helped them understand the process a little better. Videos: The Amoeba Sisters Photosynthesis This is the one we watched in class in case anyone wants to review again. Photosynthesis from Bozeman Science Another, longer, overview oh the process. The Most Amazing Thing About Trees Not related to photosynthesis, but another video that points out just how incredible plants are! Activities: Photosynthesis demonstration--check out this video to see how you can observe photosynthesis.
0 Comments
 We started with a couple of activities to review today. First, I had a few plants and plant parts for the kids to look at. They were asked to determine if they were angiosperms or gymnosperms, and then dicots or monocots. They were able to use their notebooks where we had written about these classifications to help them and most were able to figure out at least a few of the items. There were a couple that we honestly didn't have enough information to tell for sure, but it was fun to try and use the clues that we did have to make a good guess.  They also worked as a group to fill in the classification poster that we had discussed the first week and wrote down examples for the different categories.
Then, we went over the parts of the leaf and they finished coloring their leaf flip books.
After that, we moved on to the roots of the plant. We watched part of a video on plant structures and functions and then dissected a familiar root--a carrot.  I think they enjoyed looking at a common food that they were familiar with and seeing the various layers that we'd just learned about. They labeled a diagram with the different parts as we looked at them, and then most of them sampled their carrot (not always a safe thing to do in science class, but we told them they should never eat anything from a lab unless they were told otherwise.) They pulled apart the center section that has the vascular tissue and compared its taste to that of the outer cortex (most thought the center was sweeter.) Just another way to explore plants.
Videos: BBC How Plants Communicate--This 52 minute documentary brings plants to life in a new way and might change the way you see them forever. I think the kids will find it fascinating. Electrical Experiments with Plants--Do you think a plant can count? Make decisions? A TED talk looking at whether or not plants can think. Activities: Why Do Leaves Change Color? This is a pretty simple experiment to do at home and would be fun for younger siblings to help with, too. It probably needs to wait until the trees and bushes with color changing leaves get their new leaves. Water Transport Experiment Another simple experiment that many of you have probably done, but a great visual for how water moves through a plant in the vascular tissue. Gizmos Website If you haven't seen this site before, it's a virtual science lab with tons of experiments that they students can conduct online. I believe that you can set up a free account (and if you are with Valley View, I think your teacher has already set up an account for your students, maybe other charters have as well.) I've highlighted the plant section here. See if any of these labs look interesting to your students!  We began today with review of monocots and dicots (types of flowering plants) and then continued our discussion of plants by talking about what plants need to live--water, nutrients, sunlight, and CO2.  The students paired up to make a poster to illustrate these needs.
Everyone will be making observations on their seeds and potato over the next couple weeks while we test the requirements for plants to grow.
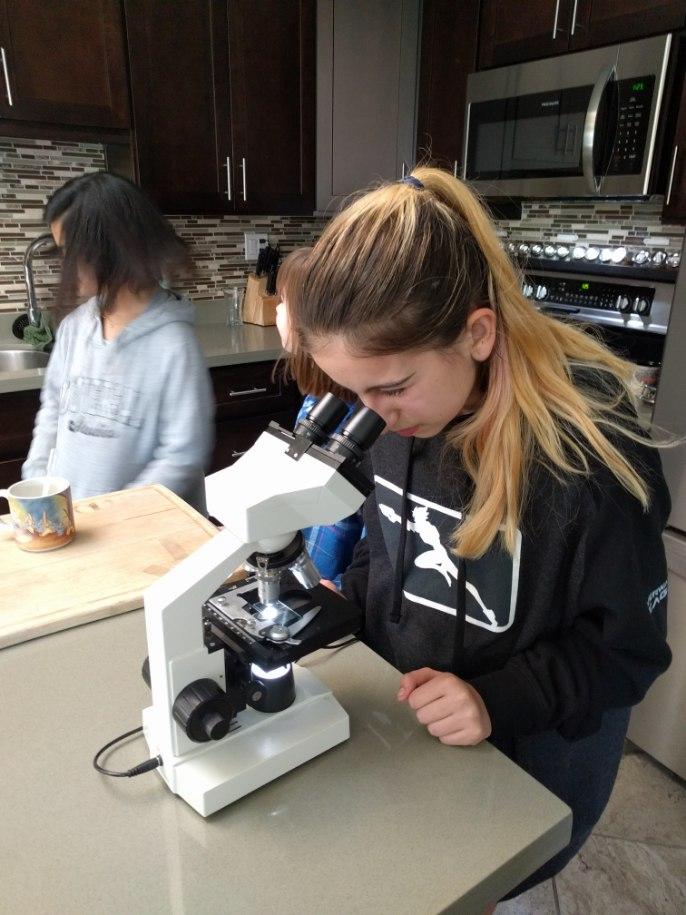
Next, we talked about plant structure. Plants are fairly simple--roots, stems, leaves, and fruit/flowers, which makes them a good organism to begin looking at specialized tissue and systems before we jump into human organ systems. We didn't have much time to get into the details, but did briefly introduce the leaf and started a flip book on the various layers of cells in the leaf which we will continue next week. Follow up ideas: Videos: Plant Structure and Adaptations--I was going to show this video in class, but was having problems with the TV, but this is a good one to review plant classification and look into plant structure. Structure of the Leaf-- This goes over the parts of a leaf, which we will be continuing to discuss next week. The Forest Tree-- This video gives a quick overview of the structure and function of trees Activities: If you have a microscope at home, you can view the stomata on a leaf at home. This activity from the CA Academy of Sciences explains how to prepare slides of the top and underside of a leaf so you can compare the number of stomata. Can you explain why there is a difference in the number between the two? Leaf Chromatography--Explore the colors found in leaves (there are still some late-changing leaves around that you can do this with--go on a leaf hunt!).  This week, we began our unit on plants and started off with some real world observations in the back yard. Any chance the students have to explore their natural environment and be scientists brings the topics to life, so I really try to incorporate this as much as possible and as we are moving into the world of things that are big enough for us to see, this will be easier and easier.  They each picked three plants to study and compare. I was a little worried that January might be a difficult month to observe plants, but luckily, living in CA, winter is pretty gentle and our backyard is full of green right now. Based on their observations, we were able to have a discussion about the traits of plants and then went through our checklist from our unit on characteristics of life and made a list of how plants fit those requirements. We then watched a couple short videos and filled out a not taking guide about the plant kingdom classification. We will be coming back to a lot of these terms and concepts in the next three weeks, but I wanted to introduce them to the vocabulary so we could start getting comfortable with the terms.  We ended how we began, outside, looking at the plants and opening up bean seeds to see the plant embryo inside. Ask your child if they remember a couple basic ways to tell a monocot from a dicot plant.
Follow up ideas: Videos: Classifying Plants This video is longer than the ones we watched in class, and covers everything very clearly if you would like to review what we discussed. Bean Time Lapse It's really fun to watch plants grow! Young Sunflowers Follow the Sun We talked about how some plants react to the sun and move with its light. We had mistakenly said that the sunflower's flower will do this, which a couple of the students were skeptical because the flower isn't the part that photosynthesizes. This video shows that it is actually the young plant with only a flower bud that moves with the sun. Activities: Go out in your yard, visit a park, or go for a hike and see if you can identify flowering (angiosperms) and non-flowering (gymnosperms) plants. When you find flowering plants, see if they are monocots or dicots (we will learn more about this next week, but this week, we learned that monocots usually have flower petals in multiples of 3, dicots are multiples of 4 or 5; monocot leaves have long, parallel veins, dicot leaves have branching veins--think maple tree leaves). Find seeds, either from plants outside, or look through your kitchen, and try opening them up and looking for the plant embryo. Large beans, like pinto (which is what we used in class) or kidney or great northern beans work great. Look at corn to see a monocot seed. This video goes over how you can examine the seeds, although you can also keep it pretty simple and just rub the soaked seed gently in your fingers to remove the coat and then separate the parts. |
AuthorWrite something about yourself. No need to be fancy, just an overview. Archives
May 2020
Categories |


 RSS Feed
